16 January 2017

Website gehost bij Antagonist.nl : https configureren met gratis SSL certificaat van ZeroSSL [Updated 1/6/2017]

Waarom https i.p.v. http gebruiken?

  • veiligheid: alle verkeer van en naar je website wordt geëncrypteerd
  • vertrouwen: bezoekers weten zeker dat ze op jouw website zitten; In de URL staat een gesloten slotje; in Chrome is dit slotje groen gekleurd
  • Het helpt je ranking bij Google
  • Vertrouwelijkheid, Authenticiteit, Integriteit
Opdat je site https zou kunnen gebruiken, heb je een SSL certificaat nodig. Zo'n certificaat kost normaal gezien geld (vanaf 8 euro/jaar ), maar het kan ook gratis al moet je dan wel elke 3 maanden het certificaat vernieuwen.

De procedure om een WordPress website gehost bij antagonist.nl te voorzien van een gratis SSL certificaat zodat https kan gebruikt worden,  wordt hieronder beschreven:

[Update 1/6/2017] Antagonist.nl voorziet voortaan zelf de gratis certificaten zodat onderstaande procedure niet meer moet uitgevoerd worden.

Gratis SSL certificaat aanvragen bij ZeroSSL.com

  1. Surf naar http://zerossl.com
  2. Online tools > Start
  3. Vul bij domains: [jouwDomainNaam.xxx] in en accepteer onderaan de 2 voorwaarden.
  4. Klik op Next en Yes (include www-prefixed version too?) zodat ook www.jouwDomainNaam.xxx  in https mode kan gebruikt worden
  5. Er wordt nu een CSR gegenereerd 
  6. Download de CSR
  7. Klik op Next. Er wordt een account key gegenereerd
  8. Download de account key (= RSA PRIVATE KEY)
  9. Klik op Next
  10. Volg de instructies voor de verification. Je moet 2 files aanmaken en op de site plaatsen:
    • Verification
      Je bewijzen dat je toegang hebt tot de webserver waarvoor je het SSL certificaat aanvraagt.
      Daarom moet je een file met een lange filename en met de Text als inhoud uploaden (via ftp) in .well-known/acme-challenge/ folder
      Let op dat de filename GEEN extensie (bv: .txt) bevat !
      En upload file via ftp in
      /domains/[jouwDomainNaam.xxx]/public_html/.well-known/acme-challenge/
      (vergeet het puntje niet voor well-known)
      Voorbeeld van zo'n filename:
      O1zoMcIK1t9j4CdOP1K-q6jljeUJ_ufbhs0MGiFz5AE
      Inhoud van die file: O1zoMcIK1t9j4CdOP1K-q6jljeUJ_ufbhs0MGiFz5AE.8uULhAGr4bCmGiLXjmaeFdudtbUmv9UvP_AzJ9hDBUsJe kan daarna te testen of de link bereikbaar is door erop te klikken http://[jouwDomainNaam.xxx]/.well-known/acme-challenge/O1zoMcIK1t9j4CdOP1K-q6jljeUJ_ufbhs0MGiFz5AE
  11. Klik op Next
  12. Op deze pagina krijg je het certificate (=public key) te zien. Download die files ook
    1. Tip:Print die pagina als pdf  
      Klik op “Download” om het certificaat te downloaden > domain-crt.txt
  13. Copy en paste de private key (RSA) en public key via (eerst inloggen op je DirectAdmin account bij antagonist.nl) DirectAdmin > Home !!!! > SSL Certificates
      • Copieer private key (RSA) en public key (certificate)  in dezelfde textarea als “Paste a pre-generated certificate and key” . Let op: er mogen geen lege lijnen in de textarea voorkomen.
      1. In de tekst area staat nu iets in de zin van:
        ----BEGIN RSA PRIVATE KEY-----
        MIIJKgIBAAKCAgEAilWecOgQNt42MqkZljyPmuv8FENQBK1i76YaYnfihFSXbnmh
        ...
        -----END RSA PRIVATE KEY-----
        -----BEGIN CERTIFICATE-----
        MIIGGjCCBQKgAwIBAgISAzPpG9pskoG46sUoOAGxqD4kMA0GCSqGSIb3DQEBCwUA
        ...
        -----END CERTIFICATE-----
        -----BEGIN CERTIFICATE-----
        MIIEkjCCA3qgAwIBAgIQCgFBQgAAAVOFc2oLheynCDANBgkqhkiG9w0BAQsFADA/
        ...
        -----END CERTIFICATE-----
      2.  klik op Save

    Bezoekers automatisch doorsturen via HTTPS

    Makkelijkst is om alle http traffiek automatisch te redirecten naar https.
    Wijzig public_html/.htaccess op je website: voeg volgende rewrite rule bovenaan toe:

    RewriteEngine On
    RewriteCond %{HTTPS} !=on
    RewriteRule ^(.*)$ https://%{HTTP_HOST}%{REQUEST_URI} [L,R=301]


    Oplossing voor mixed content - Wordpress plugin SSL Insecure Content Fixer

    Als je Wordpress gebruikt worden alle links vast gecodeerd als http://[jouwDomainNaam.xxx]/..
    Daardoor zal je pagina als mixed content worden beschouwd en niet beveiligd zijn.
    Gelukkig bestaat er een plugin die dit oplost zodat je niet alle htmlcode moet aanpassen:
    SSL Insecure Content Fixer.

    Installeer Wordpress plugin SSL Insecure Content Fixer


    1. Ga naar je Wordpress dashboard en kies Plugins.
    2. Zoek plugin SSL Insecure Content Fixer, installeer en activeer die plugin.
    3. Bij instellingen van de plugin kies je:
    4. Instellingen > SSL Insecure Content Fixer Settings
    5. [x] Content (zodat de http:// voor images vervangen wordt door https://)

    Voilà, voortaan wordt [youwDomainNaam.xxx] automatisch via https afgehandeld.

    P.S. Vergeet niet het gratis SSL certficaat elke 3 maanden te vernieuwen !

    16 November 2016

    Download music from youtube using Linux


    Simple procedure to download music from youtube using the command line in Lubuntu (probably works also in other Linux distributions)

    16/11/2016
    • Open Xterm
    • Download software (needed only once):

      • sudo apt-get install parcellite
        (this helps to copy & paste from e.g. firefox navigaton bar to Xterm window)
      • sudo apt-get install lame
        More info about the mp3 encoder Lame
      • sudo wget https://yt-dl.org/downloads/latest/youtube-dl -O /usr/local/bin/youtube-dl
      • sudo chmod a+rx /usr/local/bin/youtube-dl
         
    • Download a song (put everything on 1 line !)
      /usr/local/bin/youtube-dl --extract-audio --audio-format mp3 https://www.youtube.com/watch?v=.......
      
    • The mp3 file is saved in the current directory op your Xterm window
    References:
    • http://askubuntu.com/questions/237942/how-does-copy-paste-work-with-xterm
    • http://askubuntu.com/questions/791969/error-while-using-youtube-dl
    • http://askubuntu.com/questions/178481/how-to-download-an-mp3-track-from-a-youtube-video 

    13 July 2016

    Run Windows 10 on Linux Mint using virtualbox

    The screen of my portable is acting strange from time to time. 
    Maybe the video controller has a problem ...
    To be sure I do not loose anything from my portable, I decided to virtualize it and check to see if I could run this virtualized pc on Linux Mint using virtualbox.

    Important: my portable runs Windows 10 - 64-bit, so in order to run the virtualized version I also need a 64-bit OS. I chose Linux Mint Mate 64-bit as host OS.

    The test succeeded : I can run my Windows 10 64-bit portable in Linux Mint using virtualbox.

    Here is what I did:
    • Virtualize the portable
      • (on my running portable I wanted to virtualize:)Using "VMware vCenter Converter Standalone" I converted my portable running Windows 10 64-bit to a virtual machine. The result was a vmdk file. I copied the files (vmdk and vmx file) on an external usb disk.
      • The software can be found at : https://www.vmware.com/products/converter
    • Download and install Linux Mint on a USB stick
      • (on a windows pc) On the internet, search for "Download Linux Mint 18 Sarah"
      • Download linux mint :
        • https://www.linuxmint.com/download.php
        • Download the Mate 64-bit version from one of the servers listed.
          I used the server in Europe > Netherlands > Triple IT
          (1.6 GB is being downloaded)
      • (on a windows pc) Burn iso to USB stick
        • Use UNetbootin to burn the downloaded ISO to a USB stick (USB stick needs of course at least 2 GB of free space)
          • [x] Diskimage  - ISO
          • Navigate to your download folder
          • select linuxmint-18-mate-64bit.iso
          • Type: USB-disk  E:\   [OK]
        • Alternatives for UNetbootin:
          see http://www.howtogeek.com/127377/the-best-free-tools-for-creating-a-bootable-windows-or-linux-usb-drive/
      • Start Linux Mint from USB stick
        • Boot the PC you want to use with the Linux on your USB stick
        • On some computers you can/need press F12 or Esc and F9   to choose the (USB) device you want to boot from.
        • If boot does not work, check bios.
      • Optionally change keyboard layout (Menu > Keyboard > Layouts > Add > Country: Belgium > Add
        Move "Belgian" above "English (US)" > Close
      • Download, install and start virtualbox
        • Start Terminal
        • Type "sudo apt-get install virtualbox-qt" to download and install virtualbox (this will take quite some time so be patient).
        • Type "virtualbox" in the terminal window to start virtualbox
          • Add and the virtual machine
            • Be sure the USB disk with the Windows 10 vmdk file is attached to your PC
            • New
              • Name : type some name e.g. vmWin10
              • Type: Microsoft Windows
              • Version: Windows 10 (64-bit)
                • Next
              • 2 GB Ram is sufficient
                • Next
              • [x] Use an existing virtual hard disk file
                • Navigate to the vmdk file on the external hard disk > Open > Create
            • Click on the Start (green arrow) (and wait at least 5 minutes ... it takes some time to start Windows 10 in virtualbox, but it works !
              P.S. In virtualbox, the Ctrl+Alt+Delete is replaced by right Ctrl+Del to login in Windows

      Using RDP (Remote Desktop) to connect to vmWin10


      • Configure virtualbox > Machine > Settings > Display > Remote display > [x] Enable Server (Server Port: 3389)
      • Configure virtualbox > Netwerk > Attached to : Bridged adapter (Name: enp2s0)
      • Enable RDP in vmWin10 : Control Panel > System > Properties > Remote Desktop > [x] Allow remote connections to this computer
      • If necessary : Disable firewall in vmWin10 (or allow RDP through) : Control Panel > System and Security > Windows Firewall > Turn Windows Firewall on or off 
      • Verify IP address of you vmWin10 : in Windows > Start > cmd > ipconfig
        Note the IPv4 address (in most cases something like 192.168.x.y)
      • On another pc on your network : start > mstsc /v:192.168.x.y (replace by ip address of your vmWin10)


      12 May 2015

      eID reader - Linux Mint, Windows 7 en Windows 10 [Last update 23/6/2017]

      Belgische Identiteitskaart (eID) gebruiken onder Linux Mint 17, Windows 7 en Windows 10


      Voor Linux Mint 17

      Onderstaande procedure werkte voor mij om de eId bruikbaar te maken onder Linux Mint 17 :
      1. Sluit de eid-lezer aan op een USB poort en steek je Identiteitskaart in de lezer
      2. Ik heb eerst dit geprobeerd, maar dat bleek niet onmiddellijk te werken:
        eid-archive.deb (DEB, 6.01 Kb)
        Klik op bovenstaande link.
        Na het downloaden kan je dit bestand dubbeklikken en autom. zal de Package Installer de software installeren
      3. Menu (> Administration) > Software Manager
      4. Download en installeer : (tik onderstaande stuk voor stuk in om te downloaden)
        1. beid-mozilla-extension
        2. eid-archive
        3. eid-mw
        4. eid-viewer
      5. Voor de oudere versies van de ACS ACR38U kaartleze, installeer je ook nog libacr38u als volgt:
        1. Menu > Terminal
        2. sudo apt-get install libacr38u
      6. Nu kan je testen kan via Menu > Accessoiries > eID Viewer
      7. Tip: Gebruik Firefox om bv. bij de CM (http://www.cm.be) in te loggen met je eID kaart.
        Je krijgt wel allerlei foutmeldingen, maar na installatie als "Exceptions" lukt het wel.
        (het is me niet gelukt met Google Chrome)
      8. Als je wil verifiëren of je lezer herkend wordt, gebruik dan pcsc_scan . Daarvoor kan je pcsc-tools downloaden via de Software Manager
      9. Nog inlogproblemen met firefox : zie onderstaande link:
        Hoe beveiligingsapparaten laden 'Belgium eID PKCS#11 module' 'libbeidpkcs11.so.0'
        https://eid.belgium.be/nl/aanmelden#7504

      Bron en Meer info vind je in deze FAQ 
      http://test.eid.belgium.be/faq/faq_nl.htm#Firefox_Instellen_voor_eID
      https://csam.be/ (CSAM, de toegangspoort tot de diensten van de overheid)


      Voor Windows 7 en Windows 10:


      1. Log in met een windows account met administrator privileges (administrator of beheerder)
      2. Niet nodig in Windows 10: Java installeren
        Voor Windows 7, indien nog niet geïnstalleerd: download en installeer java (http://www.java.com)
      3. Download en installeer EID software : https://eid.belgium.be/nl (sluit de EID reader pas aan op het moment dat dit gevraagd wordt !)
      4. Indien nog niet gebeurd, download en installeer Firefox: http://www.mozilla.org 
      5. Start Firefox en voeg add-on toe voor Eid Belgium : In firefox: rechts bovenaan: "Open Menu"  -  Add-ons  -  Get Add-ons  -  onderaan : See more add-ons  -  Zoek : Belgium eID  -  Add to firefox  (of  https://addons.mozilla.org/en-US/firefox/addon/belgium-eid/ ) (Deze add-on moet geïnstalleerd worden voor elke windows user die de Eid wil gebruiken)
      6. Aanmelden is makkelijkst via https://iamapps.belgium.be/sma/generalinfo?view=home
      7. Voor de belastingaangifte : Surf naar http://taxonweb.be en kies je taal
      8. Klik om Naar mijn aagifte

      Problemen met eID

      [01/06/2017]
       (Voor firefox) 
      Check waarvoor certificaat van Belgium Root CA? kan gebruikt worden:
      Het certificaat van Belgium Root CA3 moet vertrouwd worden voor o.a. websites te identificeren -in firefox : Opties - Geavanceerd - Encryptie en Certificaten bekijken - zoek Belgium Root CA3 - Bewerken : vink de 3 checkboxes aan

      [23/06/2017]
      Error: Popup om pincode in te geven verschijnt niet maar melding "Aanmelden mislukt"
      Oorzaak Kaspersky Internet Security
      Oplossing:

      • Open Kaspersky Internet Security
      • Links onderaan op het radertje (instellingen)
      • Extra - netwerk
      • [x] Versleutelde verbindingen niet scannen
      Met dank aan http://www.aideacces.be/12.php?langue=NL Op die site vind je nog meer tips om eID problemen op te lossen.


      28 November 2014

      View photos that are stored on your Linux Mint Pc on your Android tablet

      How to view photos on a tablet (photos are stored on a PC)

      I currently use Linux Mint as desktop PC and an Android tablet.
      My photos are stored on the desktop PC, but I wanted to view them also on my tablet.

      This is what I did:

      1. On the Linux Mint desktop PC : download system-config-samba
      2. Start this program and click on the + to add a directory (in my case: /mnt/data/Our Pictures)
        1. On the Basic tab :
          1. Directory : /mnt/data/Our Pictures
          2. Share name : Our Pictures
          3. [x] Visible
        2. On the Access tab : [x] Allow access to everyone
          Note: If you want a more secure access, you can choose to allow access to specific users
      3. On the Android tablet: Go to the Play Store and Search for "smb client"; Download (and install of course) ES File Explorer File
      4. Start ES File Explorer
      5. On the top left click on the 3 horizontal bars to display the menu and choose "Network" > Lan
        Click on the + (New):
        1. Server: /Our Pictures e.g. 192.168.1.3/Our Pictures
        2. [x] Anonymous
        3. Display as : Our Pictures on my desktop PC
      6. Now if you click on "Our Pictures on my desktop PC" you'll see the files  on the desktop pc
      References:

      23 March 2013

      Down the mountain with my new Nokia Lumia 800 (Stabilized)

      How to turn a shaky movie made with a Nokia Lumia 800 into a much better (stabilized) experience.


      The video has been modified with the YouTube standard image stabilization because it's a very shaky film
      You can also watch the original to compare the result.
      Search for "nokia lumia 800 stabilizer" on youtube if the link does not work.

      P.S. The film is not mine, I just place a link to it from my blog. All rights belong to the person who originally uploaded the movie on youtube.

      01 March 2013

      Windows 7 startup slowly at home

      Windows 7 takes a long time to start at home


      Problem

      When I am not connected to the LAN at work, windows 7 takes a long time to startup while displaying "Waiting for the User Profile Service"

      Solution

      Thanks to Chris Buchanan, I have found the solution at http://www.chrisbuchanan.ca/Blog/Lists/Posts/Post.aspx?ID=17

      What you need to do is to change the Local Group Policy setting the max. wait time for the network ... to 0

      Procedure:


      1. Start  > gpedit.msc
      2. Computer Configuration > Administrative Templates > System > User Profiles
      3. Edit the policy "Set maximum wait time for the network if a user has a roaming user profile or remote home directory" to "Enabled" and set the value Wait for network for maximum (seconds) to 0.
      4. OK
      5. Close policy editor
      6. Then force an update of the group policy (gpupdate /force) (this worked only when I was connected to the LAN at work)

      Since I did this, the startup time decreased from more than 1 minute to 20 sec. on my Dell XPS 15z (Core i7) laptop.

      More details can be found  at http://www.chrisbuchanan.ca/Blog/Lists/Posts/Post.aspx?ID=17


      02 November 2012

      Connecting Mobile Phone through Portable PC


      Connect your smartphone to the internet via your portable


      So, I got myself a new smartphone (with Windows Phone7.5) (Nokia Lumia 800).

      At some places I have no wireless network available, but I still want to reach the internet via my smartphone.

      This is possible if
      • you have a portable PC with Intel My WiFi Technology
      • your portable is connected to the Internet
      • you follow the configuration instructions below


      Configuration instructions:

      On your Portable PC (which is connected to the internet):


      1. Start - Network and Sharing center
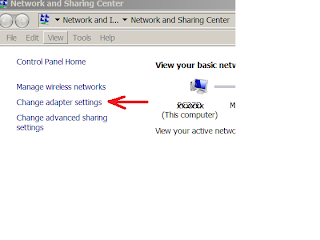
      2. Change adapter settings
        Change Adapter Settings
        Change Adapter Settings
      3. Choose your interface (which is connected to the internet)
        e.g. Wireless Network home or Local Area Network

        Interface with Internet access
      4. Doubleclick this interface and choose Properties
      5. Tab Sharing
        • [x] Allow other network users to connect through this computer's Internet Connection
          Home networking connection: choose the correct name e.g. PC37Dhotspot
      6. PC37Dhotspot - Microsoft Virutal WiFi Miniport Adapter @2) : 192.168.137.175
        • Assign PC37Dhotspot IP address 192.168.137.175 netmask 255.255.255.0

      1. Start - Intel My WiFi Utility
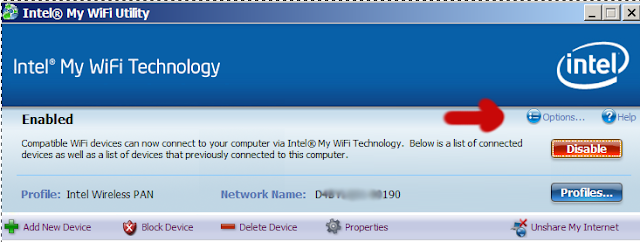
      2. Options

        Options
      3. General
        [x] Autom. enable Intel My WiFi Technology on system startup
        [x] Show taskbar icon
      4. Notifications
        [x] Notify when devices connect to this computer
        [x] Notify when devices disconnect from this computer
        [x] Nofify when new devices try to connect to this computer
      5. DHCP
        assign your DHCP range to e.g.
        Start IP 192.168.137.173
        End IP 192.168.137.181
      6. Power
        Enable Intel My WiFi only when power source is
        [x] Any power source
        Autom. disabling: Never
      7. Profile
      8. Intel Wireless PAN (preset) - Edit Profile name : Intel Wiireless PAN
        SSID : D4B.....-..190 (choose your own SSID ;-)
        Security
        Security Type: WPA2-PSK
        Encryption Type: AES-CCMP
        Password: ....... (choose your own password)
        Sharing
        ICS and Bridging filter : Disabled
        DHCP and DNS : Enabled (at home) or Disabled (at work because other DHCP and DNS servers are available

      Be sure Enabled is visible on the same line as the Options... Help links
      Disable/Enable toggle

      On your mobile


      1. Settings
      2. Wifi
      3. Switch to on by moving the slider to the right
      4. Find your SSID (D4B.....-..190) and tap on it to connect
      5. Wait a few seconds ... Connected should appear under the SSID

      Now you can start using the internet on your mobile (traffic goes via your pc)

      19 February 2012

      VirtualBox - Oracle VM - networking

      I had some trouble finding a working solution for running Oracle ( ovm3 ) in Virtualbox 4.1.8 on Windows 7 Professional 64-bit.

      After a while, I found this configuration works (at least the connection between Host and Guest) :


      1. After installing Virtualbox, an extra networking device appears : VirtualBox Host-only Network (1)
        (see Control Panel > Network and Inteternet > Network Connections > Change adapter settings)
        Host-only means you can only establish a connection between guest and host,  your guest will not be able to connect to e.g. the internet
      2. This adapter  (1)  has IP address 192.168.56.1
        (see Control Panel > Network and Inteternet > Network Connections > Change adapter settings > Select VirtualBox Host-Only network > Details
      3. Now change the settings of the virtual machine ovm3 in Oracle VM VirtualBox Manager:
        1. Select ovw3
        2. Click on Settings (and wait until the config is fully read)
        3. Click on Network and choose Adapter 1
          1. [x] Enable Network Adapter
          2. Attached to: Host-only Adapter
          3. Name: VirtualBox Host-Only Ethernet Adapter
          4. In the Advanced section I left the settings to their defaults:
            1. Adapter Type: Inter PRO/1000 MT Desktop (82540EM)
            2. Promiscuous Mode: Deny
            3. Mac address .....
            4. [x] Cable connected
      4. Start the virtual machine ovm3
      5. Configure the network settings as follows:
        1. System > Administration > Network
        2. Enter password for root
        3. Tab Devices : select eth0 and click on Edit
          1. Statically set IP address:
            1. Address: 192.168.56.56   (or another in range 192.168.56.x)
            2. Subnet mask: 255.255.255.0
            3. Default gateway: 192.156.56.1
        4. Tab Hosts: I entered the same IP (..56) for the current hostname (don't know if this is really necessary)
      6. Save this configuration: File > Save
      7. Go back to tab Devices , click on Deactivate and Activate to finalize the network setup 
      8. Now you should be able to ping 192.168.56.56 and 192.168.56.1:
        Applications > Accessoires > Terminal
        ping 192.168.56.56     ...  OK
        ping 192.168.56.1    ...  OK
        pinging other IP addresses won't work because we are using the host-only  configuration in VirtualBox.
      9. Test login OVM console:
        From e.g. Internet Explorer in Windows:
        http:192.168.56.56:7001/ovm/console
        Login as admin/Welcome1
      10. Test sql*plus
        In ovm3: start sql*plus and login as ovs/Welcome1@XE
        Also working :
        -  connect system/Welcome1@XE
        - connect sys/Welcome1@XE as sysdba
      11. Start Oracle Application Express
        http://localhost:8080/apex/apex_admin
        Login als admin/Welcome1 ... je moet onmiddellijk je paswoord wijzigen (Welkom9!)

      12. Login as sys/Welcome1
        Create a new database user:
        Database username: mvr
        Application username: mvr
        Password: Welcome1
        Create Workspace mvr
        Manage workspaces > mvr > Manage developers and users > create/edit user mvr en ken paswoord toe
        Use http://localhost:8080/apex to login workspace mvr username admin password Welkom9! .. lukt niet (ook niet als user mvr)

        Oeps ... I can't yet connect  to http://192.168.56.56:80/apex from Windows
        (Might not be needed anymore, because the cause was the firewall, see further)
        EXEC DBMS_XDB.SETHTTPPORT(8080);exec dbms_xdb.setListenerLocalAccess (l_access =>FALSE)
        ;
        Solution: Disable the firewall in ovm3 (or add port 8080 to the exception list)
        System  > Administration > Security Level and Firewall > Firewall: Disabled
        Now I can use I.E. in Windows to use   http://192.168.56.56:8080/apex
      13. Accessing APEX from SQL*Developer
        1. Tried but failed:
          Hostname: 192.168.56.56
          Port 1521
          SID: XE
          Got error:
          Status: Failure - Test failed: IO Error: The Network Adapter could not establish the connection
        2. Solution:
          In ovm3:
          1. /etc/hosts:
            Verify/add 
            192.168.56.56   wwwdevpc37d.as.local    wwwdevpc37d
          2. In listener.ora and tnsnames.ora:
            replace localhost with   wwwdevpc37d.as.local 
          3. tnsping wwwdevpc37d.as.local
        3. In windows:
          1. c:\windows\system32\drivers\etc\hosts
            Verify/add 192.168.56.56 wwwdevpc37d.as.local
          2. In sql*developer add a Connection:
            Connection name: test1
            Username:sys
            Password: Welcome1
            [x] Save password
            Connection type: Basis  Role: sysdba
            Hostname: wwwdevpc37d.as.local
            Port: 1521
            SID: XE


      14. Info Listener.ora :
        su - root
        su - oracle

        .
        /u01/app/oracle/product/11.2.0/xe/bin/oracle_env.sh  (don't forget the point + space at the start of this line)

        locate listener.ora

        nano 
        /u01/app/oracle/product/11.2.0/xe/network/admin/listener.oralsnrctl status
      15. Finally got bridged network working. This way the guest machine also can reach the internet.
        (this works for me:)

        Make sure host and guest OS share the same network segment e.g. 192.168.1.*
        Use the correct interface in Settings > Network:
        In my case:
        Adapter 1 [x] Enable Network Adapter
        Attached to: Bridged Adapter
        Name: Intel(R) Centrino(R) Advanced-N 6230 (=my wireless network adapter of the host)
        Advanced (leave the defaults): Adapter Type: Intel PRO/1000 MT Desktop 58254OEM)
        Promiscuous Mode: Deny
        [x] Cable connected


        In the guest VM :
        Not a bad idea to record your ip address and hostname in /etc/hosts
        Assign IP address, gateway and DNS:
        System > Administration > Network
        Doubleclick the eth0 interface and fill out a static IP address, mask and gateway (same as your host)
        On the DNS tab, fill out the Hostname, DNS (same as your host or e.g. 8.8.8.8)

        File > Save
        Activate
      16. Nice link:
        http://devhub.fm/setting-up-an-oracle-11g-sandbox-dev-environment/
      17. Enterprise managerstart Oracle simply type “emctl start dbconsole” into the console .. does not work
        Probably because some environment variables need to be set correctly in emctl
        su - root
        su - oracle
        . ./setenv.sh
        locate emctl
        ... to be continued
        https://localhost.localdomain:1158/em/console/aboutApplication

      10 February 2012

      GlobeSurfer Icon 7.2 USB stick - Windows 7 Prof. 64-bit - driver installation

      Problem:
      I encountered following problem when trying to use the WLAN USB stick of Mobistar on a Win 7 Pro 64-bit: the software did not install correctly.


      Solution:
      go to: http://www.option.com/en/support/software-download/mobile-devices-solutions/icon225/
      download: GlobeTrotter® Connect 3.1 ( iCON® 225 )
      version: 3.1d0-1162


      Don't forget : in Belgium you need to use APN web.pro.be in order to connect to your work VPN.


      Cause:
      I guess the drivers that come with the Globetrotter Icon 7.2 are 32-bit, so they are not signed to use on 64-bit systems and fail to load.

      18 August 2011

      Hoe beveilig ik mijn PC

      Hoe beveilig ik mijn windows PC tegen virussen ?

      18/8/2011

      Samenvatting

      Als je onderstaande richtlijnen volgt, ben je al vrij goed beschermd tegen virussen, trojans en andere ongure programma's.
      1. Gebruik paswoorden van (minstens) 8 tekens
      2. Activeer Windows Update
      3. Installeer 1 anti-virus pakket
      4. Activeer de firewall
      5. Log niet met administrator rechten voor normaal dagelijks gebruik

      In detail

      1. Gebruik paswoorden van (minstens) 8 tekens
        Log in als Administrator (Beheerder)
        Een paswoord aanmaken doe je in Control Panel - Users - Selecteer elke user en kies "Create password"
        Gebruik in je paswoord minstens 1 hoofdletter en 1cijfer (en liefst ook nog een speciaal teken zoals !#)
      2. Activeer Windows Update
        Control Panel - Automatic Updates
        Kies voor automatic updates (uur is van geen belang)
      3. Installeer 1 anti-virus pakket
        Gratis en makkelijk: Microsoft Security Essentials.
        Zoek in www.google.com naar
        "microsoft security essentials" site:microsoft.com
      4. Activeer de firewall
        Control Panel - Windows Firewall - Zorg ervoor dat de firewall On staat
      5. Log niet met administrator rechten
        Enkel als je programma's installeert, log je in als Administrator.
        Op andere tijdstippen, log je in als een "limited" user (die kan geen programma's installeren, maar wel uitvoeren).
        Een limited user aanmaken doe je in Control Panel - Users - Create user
        Geef de user een naam en kies voor "limited".
        Geef ook die user een paswoord (zie hoger)

      11 March 2008

      Oracle 10 XE installeren op Ubuntu 7 server

      Installatie Ubuntu

      Snellinks


        Ubuntu server


      • Download Ubuntu server van internet en brandt de ISO image > "Ubuntu server" CD

      • Om geen problemen te hebben, heb ik een "nieuwe" disk in mijn pc gestoken die ik volledig voor Ubuntu zal gebruiken

      • Boot met de "Ubuntu server" CD

      • Detect keyboard : No ... Belgium ... Belgium

      • Configure network manually : IP 192.168.0.123 mask 255.255.255.0 GW 192.168.0.1

      • Hostname: ubu01 (nul een)

      • Partitioning: Guided - use entire disk > autom. worden 2 partities gemaakt: eentje voor de swap space en een ext3 partitie voor het O.S. en de data

      • System Clock UTC ? No (want anders verschilt de tijd 1 uur met de werkelijke tijd)

      • root user full name: ubu01user

      • username account: ubu01user

      • pasword : xxxxxx

      • De pc is niet aangesloten op internet vandaar waarschijnlijk dat er een wachttijd van zeker 2x5' is tijdens de config van APT-GET ... gewoon wachten dus

      • [x] OpenSSHserver (geen dns, lamp, mail, postgres,print,samba)


      • Blijkbaar worden
        libaio1 (letter o, cijfer 1) en
        bc niet autom. geinstalleerd
        (dit heeft me veel tijd gekost eer ik hier ben achter gekomen ...) => nu installeren

      • Zorg ervoor dat de CD met ubuntu nog in de CDROM speler zit

      • sudo apt-get install (je zal gevraagd worden het paswoord van ubu01user in te geven)
        libaio1

      • sudo apt-get install
        bc


      Installatie Oracle 10 xe


      • Download de debian versie van oracle xe en de documentatie van internet :
        http://www.oracle.com/technology/software/products/database/xe/index.html

      • en save op "Oracle XE" CD

      • 't Is makkelijk om de gedownloade files op de harddisk van de Ubuntu server te hebben =>

      • sudo mount /dev/cdrom

      • cp -r /media/cdrom0/* . (kan ook /media/cdrom1 zijn naargelang je configuratie)

      • Installeer XE:

      • cd xe

      • sudo dpkg -i oracle-xe_10.2.0.1-1.0_i386.deb

      • Dit duurt ongeveer 10'

      • sudo /etc/init.d/oracle-xe configure

      • aanvaard de defaults : port apex: 8080 ; port listener: 1521 ; kies password voor sys,system ... en vergeet het niet ...

      • Nu is oracle geinstalleerd en moet je meer dan 20 processen zien als je volgend commando uitvoert: (voor het pipe teken moet ik mijn toevlucht nemen tot |
        |)

      • ps -ef | grep ora

      • of

      • ps -ef|grep ora|wc -l


      • Ik wil vanop een andere pc in mijn netwerkje apex kunnen gebruiken.
        Daarvoor moet nog het volgende gebeuren:

        • sudo -i

        • su - oracle

        • find . -name oracle_env.sh -print

        • cd nu naar de directory waar oracle_env.sh staat en voer uit:

        • . ./oracle_env.sh

        • Dit zorgt ervoor dat environment var ORACLE_HOME gekend is : controleer met : echo $ORACLE_HOME

        • sqlplus / as sysdba

        • exec dbms_xdb.setlistenerlocalaccess(false);

        • exit


      • Vanop een andere pc kan je nu surfen naar:
        http://192.168.0.123:8080/apex en inloggen als system

        • Controleer eerst of je kan pingen vanop de andere pc naar je server :

          • ping 192.168.0.123

          • Lukt het niet, dan moet je eerst je netwerk controleren:

          • Op de server: ifconfig

          • Je moet zien staan

          • - eth0 ..... inet addr : 192.168.0.123

          • - lo ....... inet addr : 127.0.0.1


      • Volg verder de help in "Getting started" op deze pagina om het hr schema te unlocken en je eerste testapplicatie te maken

      Nuttige gegevens:


      • sudo shutdown -P 0 (nul) voert een shutdown uit en zet de machine af.

      • putty : met putty moet je normaal gezien op de server kunnen inloggen als ubu01user
        (
        http://www.chiark.greenend.org.uk/~sgtatham/putty/download.html voor putty download)

      • sql*developer : gratis tool van Oracle (
        http://www.oracle.com/technology/software/products/sql/index.html
        )

        SID = XE

      • Draait de listener ? ps -ef|grep LISTENER

      • Zorg ervoor dat de environment variable ORACLE_HOME steeds gezet is: zie script oracle_env.sh (zie hoger)

      • Stoppen en Starten van Oracle :

        /etc/init.d/oracle-xe stop

        /etc/init.d/oracle-xe start

      • Oracle problemen : log in met sqlplus / as sysdba ; probeer een startup nomount

      • Oracle install logs : (ingelogd sudo -i ; su - oracle)

        cd ~/app/oracle/product/10.2.0/server/config/log

        ls -l

      • Oracle scripts:(ingelogd sudo -i ; su - oracle)

        cd ~/app/oracle/product/10.2.0/server/config/scripts

        ls -l

        • Je vindt hier ook een backup script dat rman gebruikt : backup.sh

        • Backup log: /usr/lib/oracle/xe/oxe_bacakup_current.log

        • Database files : /usr/lib/oracle/xe/oradata/XE/system.dbf, sysaux.dbf, undo.dbf, users.dbf

        • spfile: /usr/lib/oracle/xe/app/oracle/product/10.2.0/server/dbs/spfile2init.ora

        • In /usr/lib/oracle/xe/app/oracle/flash_recovery_area zitten de gebackupte files. Je kan die files best tarren en op een ander medium copieren:


      • To automat. cleanup oracle trace and audit files and tail the alert log, do the following:

      • Edit /etc/init.d/oracle-xe (logged in as superuser)

        At the end of the stop() function add:


        # tail alert log mvr 28/12/2008

        $SU -s /bin/bash $ORACLE_OWNER -c "cd ~oracle/app/oracle/admin/XE/bdump;tail -10000 alert_XE.log >t.log;mv t.log alert_XE.log" > /dev/null 2>&1

        # delete old trc and aud files mvr 28/12/2008

        $SU -s /bin/bash $ORACLE_OWNER -c "cd ~oracle/app/oracle/admin/XE/;find . -name *.trc -mtime +60 -exec rm {} \; find . -name *.aud -mtime +60 -exec rm {} \;" > /dev/null 2>&1


      Backup nemen v.d. oracle database:

      • Optioneel: Start putty op een andere pc in het netwerk en log in als ubu01user

      • sudo -i

      • su - oracle

      • whoami (moet nu oracle weergeven)

      • cd app/oracle/product/10.2.0/server/config/scripts

      • . ./backup.sh

      • Er verschijnt nu een warning ivm. archive logging ... Are you sure: Y

      • "Backup in progress" verschijnt. Na enige tijd (minuten, uren naargelang de grootte v.d. database) verschijnt : "Backup of the database succeeded.

        Log file is at /usr/lib/oracle/xe/oxe_backup_current.log

        Press ENTER key to exit"

      • cd /usr/lib/oracle/xe/app/oracle/

      • tar cvf fra.tar flash_recovery_area/ (Dit duurt ook wel eventjes)

      • gzip fra.tar (Dit duurt ook wel eventjes)

      • mv fra.tar.gz /tmp

      • exit

      • exit

      • (je bent nu weer ubu01user)

      • cd

      • cp /tmp/fra.tar.gz .
      • copieer deze fra.tar.gz naar een ander medium bv. naar een XP machine m.b.v. winscp407.exe:

        • Start winscp en maak sessie : Hostname: 192.168.0.123 Username: ubu01user Password:xxxxx Save

        • Login

        • linker window: navigeer naar de destination directory op je XP pc

        • rechter window: navigeer naar /home/ubu01user

        • drag & drop fra.tar.gz van het rechter (linux) naar het linker window (xp pc)

        • Transfer mode: Binary

        • Copy


      Restore v.d. oracle database:

      Je vindt in ~/app/oracle/product/10.2.0/server/config/scripts ook een restore script dat rman gebruikt : restore.sh

      • De backup zit in fra.tgz (of in fra.tar.gz). Controleer eerst of de backup die je wil terugzetten nog op de harddisk staat in ~oracle/app/oracle/fra.tgz (dan hoef je de restore v.h. backup medium zoals hieronder beschreven niet meer te doen).

      • copieer deze fra.tar.gz van je backupmedium naar de oracle linux machine m.b.v. winscp407.exe:

        • Start winscp en maak sessie : Hostname: 192.168.0.123 Username: ubu01user Password:xxxxx Save

        • Login

        • linker window: navigeer naar de destination directory op je XP pc

        • rechter window: navigeer naar /home/ubu01user

        • drag & drop fra.tar.gz van het linker (xp pc) naar het rechter (linux) window

        • Transfer mode: Binary

        • Copy


      • mv fra.tar.gz /tmp

      • sudo -i;

      • Stop de Oracle database: /etc/init.d/oracle-xe stop

      • Onderstaande 2 stappen kan je skippen als fra.tgz nog op de harddisk staat

      • cd /tmp

      • chown oracle fra.tar.gz; chgrp dba fra.tar.gz

      • su - oracle

      • Onderstaande stap kan je skippen als fra.tgz nog op de harddisk staat

      • gunzip fra.tar.gz

      • cd /usr/lib/oracle/xe/app/oracle/

      • Als je eerst alle flash recovery wil wissen:
        •    rm -r flash_recovery_area


      • Onderstaande stap kan je skippen als fra.tgz nog op de harddisk staat

      • mv /tmp/fra.tar .

      • tar xvzf fra.tgz (of in voorkomend geval: tar xvf fra.tar)

      • cd ~/app/oracle/product/10.2.0/server/config/scripts

      • . ./restore.sh

      • Na enkele minuten (of uren al naargelang de grootte v.d. database) is de database gerestored


      Last modified: 14 jun 2008

      04 December 2005

      Add SCSI disk to Dell with PERC 4e/DI controller - RAID-5

      4 dec 2005

      As we ran out of disk space on our server, we needed to install an extra disk in our server.
      The DELL server has a PERC 4e/DI controller and the 3 disks of 72 GB which are configured in RAID-5.
      We use W2K3 as operating system.

      So we ordered an extra 72 GB and got it a week later in a big box ...
      The only documentation that came with it stated that the initialization of the disk could take very long.

      To make a long story short, we followed the following steps successfully:
      1. Shutdown the server
      2. Add the new 72 GB SCSI disk in the first free bay
      3. Start the server
      4. Goto My Computer - Manage - Disk Management (Dell OpenManage Array Manager)
        Arrays - Perc Subsystem 1 - Perc 4e/DI Controller
        -->Backplane
        ---->We see a new "Array Disk 0:3"
        --> Virtual Disk
        ----> We see Array Disk 0:0 , 0:1 and 0:2
        -> Array Group 0 : Aha ... We see that the reconfiguration process is busy
      5. After about 4 hours waiting, the Events tab shows following entries:
        a. at 4:22 PM: .... RAID-5, 136.48 GB ..... 204.73 GB .... started
        b. at 6:21 PM: .... reconfiguration completed
        c. at 6:25 PM: ... background initialization started
        d. at 8:04 PM: ... background initialization completed
        So, it took about 3 hours 45 minutes to complete the whole process
      6. Reboot the server (this step is very important !)
      7. Check "Disk Management" - Disk 0 : 68.25 Unallocated